导读:本文会从.net core框架的身份权限验证一直到IdentityServer4这块做一个系列文章。本文涉及到的内容较多,会不断完善。
.net core权限验证API涉及到的命名空间:
System.Security.Permissions

System.Security.Claims  // Volo.Abp.Security  在此API的基础上进行了扩展

System.Security.AccessControl

System.Security.Principal

System.Security.SecureString

System.Security.Cryptography // 加密解密相关库

Microsoft.AspNetCore.Identity //对于Identity中属性的一些定义
基础概念
Authentication & Authorization
Authentication → Who you are
Authorization → What you can do
权限验证的时候,服务器端一般需要知道Who you are ,以及还需要知道What you can do;一个是要知道访问者的身份,还一个是需要知道访问者的权限(能够做什么)。
系统自带的类库,提供了一些简单的Authorization验证方法。比如:
Microsoft.AspNetCore.Authorization
这个类里面主要是设置policy和roles属性,两个都是字符串类型的,policy是指定规则名称字符串,roles是指定角色名称字符串。一般这个数据是存储在数据库里面的。前端用户访问的时候,会从用户信息上下文的Context中拿到这些policy和roles信息进行比对判断用户是否具有某种权限。
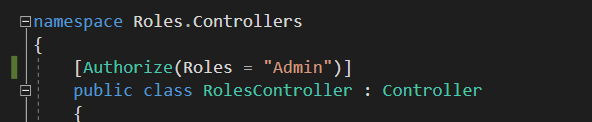
Roles具体使用:
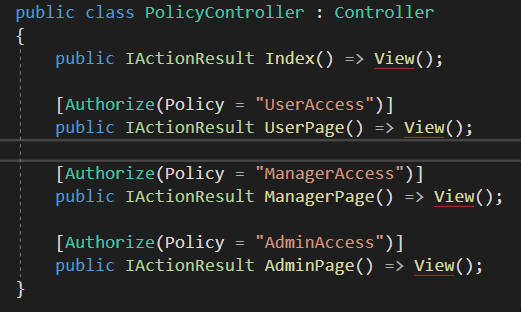
Policy具体使用:
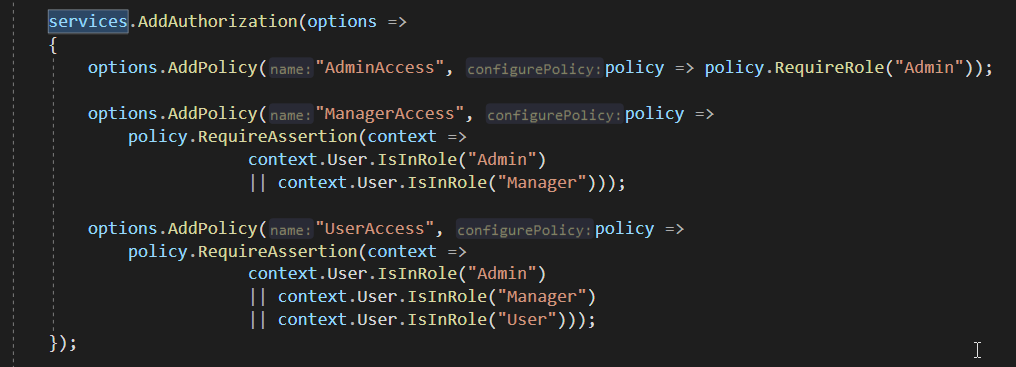
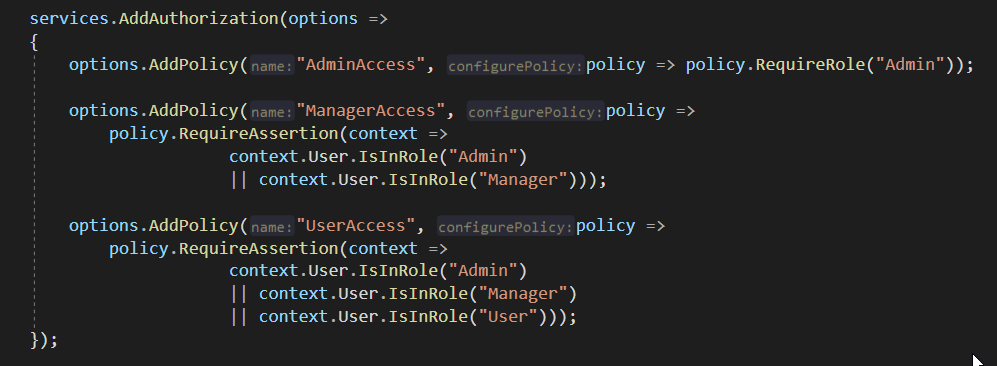
在.net core项目中,通过startup.cs中的ConfigureServices方法,可以对不同的policy进行不同的设置。比如:如果用户要进入Admin权限页面则要求Role是Admin,如果用户要进入普通User权限页面,则Role是Admin或者Manager或者User,根据不同用户的角色分配不同的权限策略。
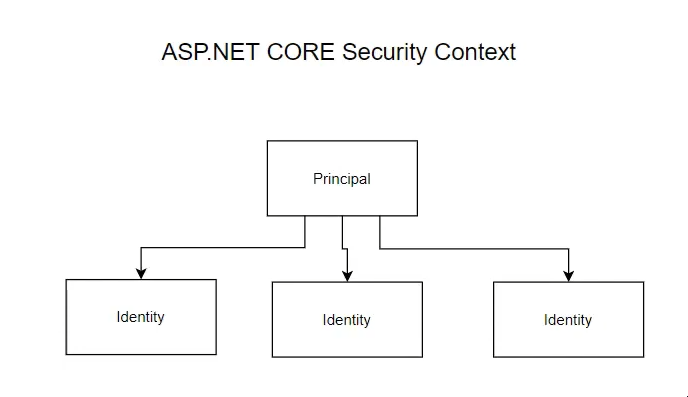
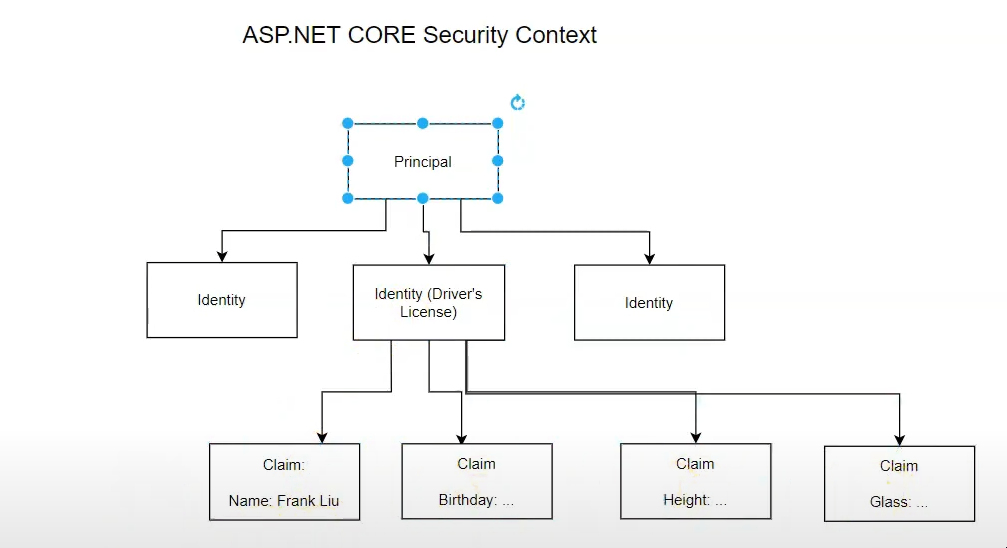
Principal
Security Context里面包含了所有用户的信息,比如用户ID,用户名,地址等信息;这些信息一般是封装在了一个Object对象中,在.net core中这个Object对象叫做claims principle,或者叫做principal object.在一定程度上它可以直接代表user.这个principal里面含有很多Identities。即:一个用户可以有很多Identity。比如一个用户可以有多种身份:学生,雇员,司机。
Identity_options
系统自带的类库中,有对Identity一些options操作的。详细可以参考源码Microsoft.AspNetCore.Identity源码。
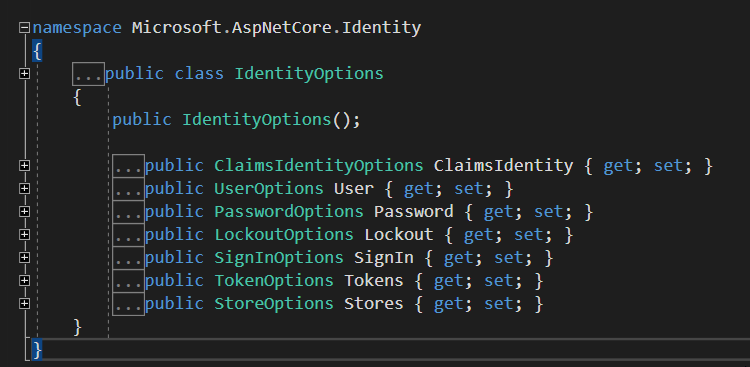
Identity中,.net core可以对于Identiy中的option做各种设置,比如:可以对用户的密码组成进行限制,密码的长度等。这些都是.net core框架类库自带的一些功能。限制的字段也是类库API内置的一些字段。如果需要自定义权限验证规则,需要自己实现policy规则,在本文下面的policy部分有详细说明。
Claim
一个Identity可以有多个claim。Claim在.net core中一般是键值对形式存在。比如Identity为司机,但是司机可以有DateStarted,表示这个司机什么时候开始从事这个行业,以计算出司机的工龄。比如3年以下工龄的,5年以上工龄的,这些就可以通过claim来识别。
一个比较常见的使用方法就是,从context上下文拿到用户的Claims对象之后查找对应的Type的Value值。以判断用户是否具备某些权限或者条件。

在国内有一种叫法,叫做“基于声明的认证“,指的是Claim这个单词;也就是context.User.Claim,它是键值对形式存在的。
授权认证这块,还有一个专有名词叫做“基于策略的授权”,指的就是policy,本文基于.net core框架源码进行了详细分析。
对于一个已经登录的用户,可以对其多个Claim进行验证(key-value),比如:Role,DateStarted可能是数据库里面用户表的某个关联字段,而字段的值是直接存储在用户表中的。

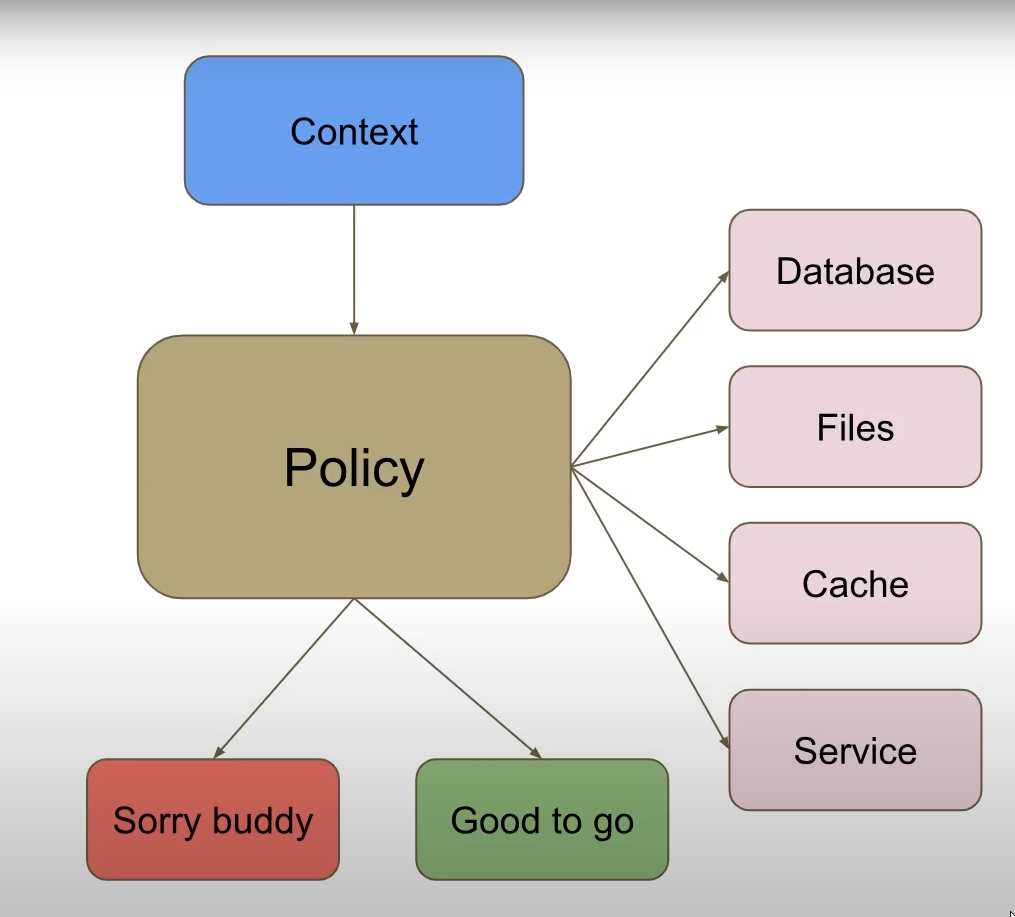
Policy
Policy就是Authorization Function,拿到User Context之后,对User数据进行具体的验证的Function,对应的是一组处理规则。微软.net core框架封装了一些常用的操作,对系统提供的Authorization命名空间下的API添加option设置,实现policy策略,以对用户访问权限进行控制。Authorization命名空间下面也提供了接口,可以让程序员自己去实现policy验证规则。
对于policy的使用,下面是添加的自定义的policy规则:Policy里面添加的是基于某些接口,程序员自己实现的class,自定义规则的实现,在下面具体详细说明。

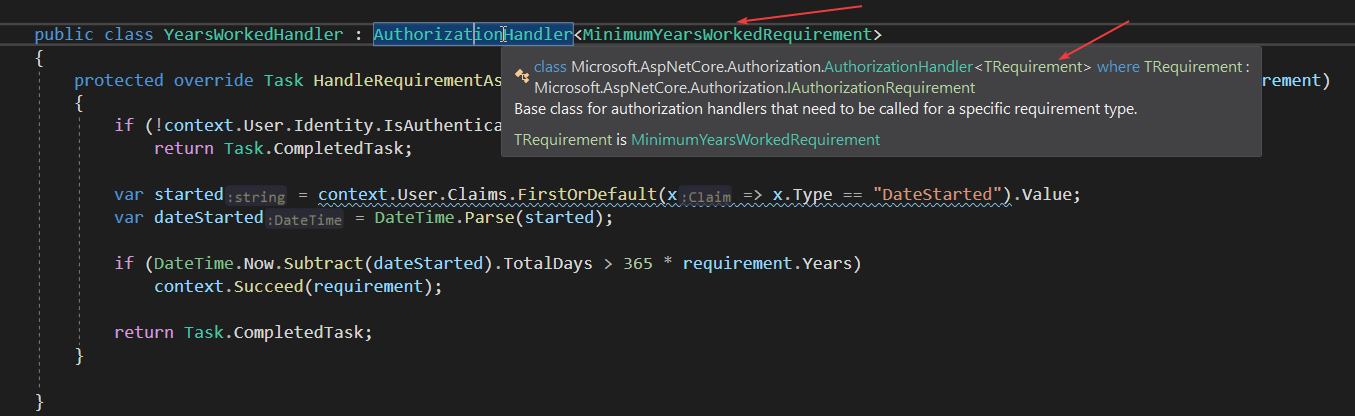
Policy自定义规则,用到2个类,一个是Requirement类,一个是Handler类。Requirement类负责传入参数,Handler类负责对传入的参数进行验证处理。Requirement类继承IAuthorizationRequirement接口,Handler继承AuthorizaitonHandler
下面的代码中可以看到,显示对用户是否登录进行了验证,然后再去验证用户的Claims数据,以判断用户是否具有某些权限。
namespace Claims.PolicyHandlers
{
    public class MinimumYearsWorkedRequirement : IAuthorizationRequirement
    {
        public int Years { get; }

        public MinimumYearsWorkedRequirement(int yearsWorked)
        {
            Years = yearsWorked;
        }
    }

    public class YearsWorkedHandler : AuthorizationHandler<MinimumYearsWorkedRequirement>
    {
        protected override Task HandleRequirementAsync(AuthorizationHandlerContext context, MinimumYearsWorkedRequirement requirement)
        {
            if (!context.User.Identity.IsAuthenticated)
                return Task.CompletedTask;

            var started = context.User.Claims.FirstOrDefault(x => x.Type == "DateStarted").Value;
            var dateStarted = DateTime.Parse(started);

            if (DateTime.Now.Subtract(dateStarted).TotalDays > 365 * requirement.Years)
                context.Succeed(requirement);

            return Task.CompletedTask;
        }
    }
}
Policy的Handler调用
自定义的这些Handler是如何被调用的呢?比如上面的YearsWorkedHandler,而我们程序中只是在控制器里面提供了Authorize拦截器,就可以使得我们自定义的Handler被自动调用了?
首先是我们在.net core中进行了自动注入配置,把Handler注入到了容器中。在startup.cs中进行了容器注入配置,这里使用的是singleton单例模式注入,如下:
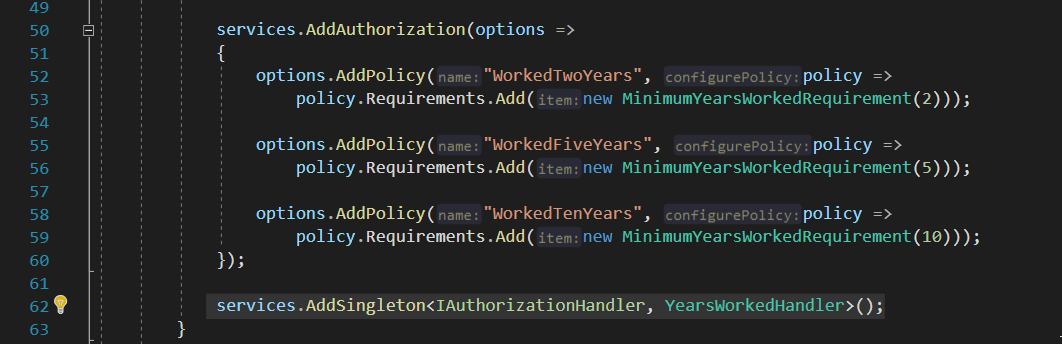
根据微软官方文档的源码,.net core框架会自动去遍历DI容器中注入的Handler,并且依次遍历之后调用。由于存在泛型约束,所以只会对Tsource对象生效,而这里的Tsource就是MinimumYearsWorkedRequirement类。
public async Task<AuthorizationResult> AuthorizeAsync(ClaimsPrincipal user,
             object resource, IEnumerable<IAuthorizationRequirement> requirements)
{
    // Create a tracking context from the authorization inputs.
    var authContext = _contextFactory.CreateContext(requirements, user, resource);

    // By default this returns an IEnumerable<IAuthorizationHandlers> from DI.
    //这里是从容器中获取Handler对象。
    var handlers = await _handlers.GetHandlersAsync(authContext);

    // Invoke all handlers.
    //调用具体的Handler方法,调用的时候,会去过滤相应的TResource对象,具体的代码,在下文的截图中红色标记部分
    foreach (var handler in handlers)
    {
        await handler.HandleAsync(authContext);
    }

    // Check the context, by default success is when all requirements have been met.
    return _evaluator.Evaluate(authContext);
}
.net core框架中AuthorizationHandler.cs原来的实现如下:(本案例中进行了Override,提供了自己实现的policy)
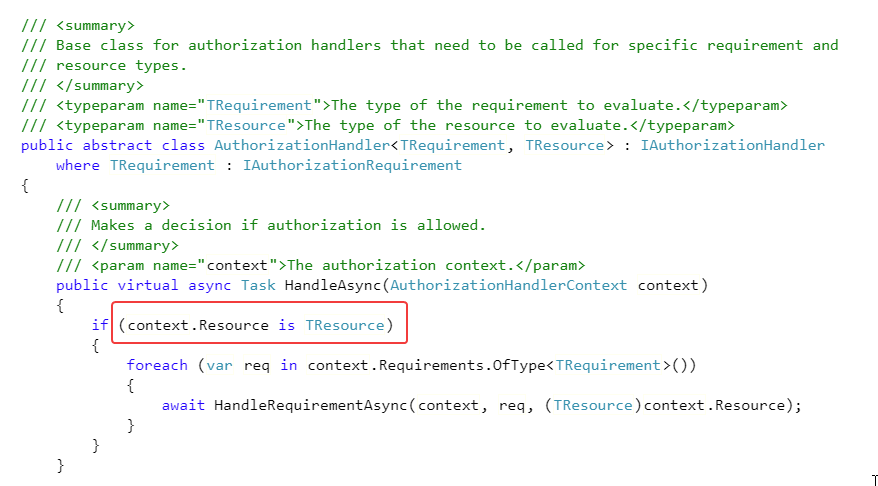
代码执行的时候,会判断泛型约束,代码会去检查类型是否符合Handler的要求,符合的话就会调用上面的自定义的HandleRequirementAsync,这就是整个Handler调用过程。
Policy授权验证
select c.UserName,c.Email,a.Name as RoleName from AspNetRoles a left join AspNetUserRoles b on a.Id=b.RoleId left join AspNetUsers c on b.UserId=c.Id
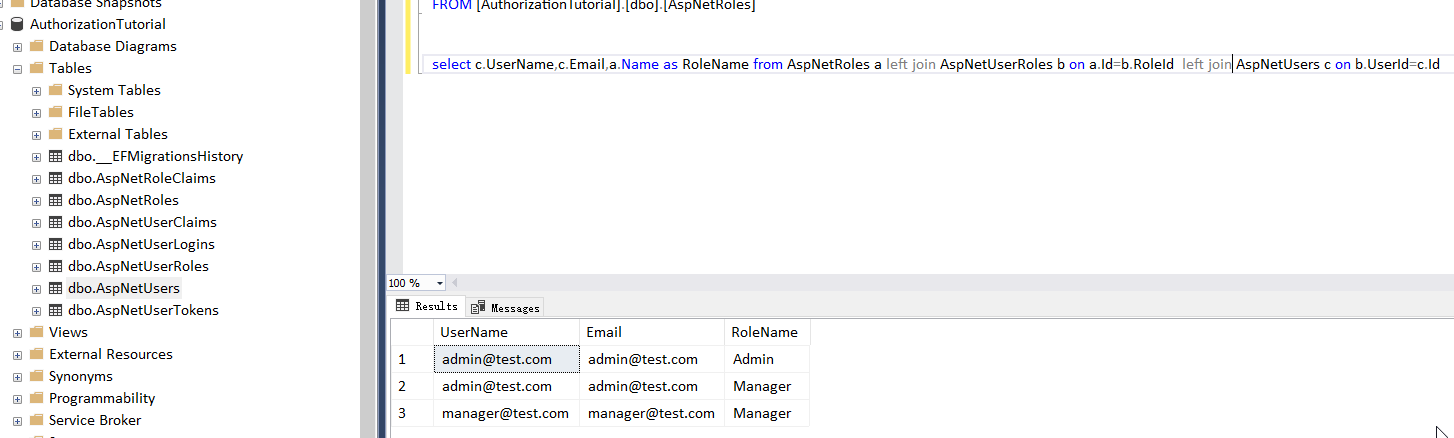
程序中首先设置自定义的policy规则,因为数据库中存在了AspNetRoles角色表,AspNetUserRoles用户-角色中间表,AspNetUsers用户表。通过EfCore CodeFirst模式创建。
在setup.cs的configure设置中,自定义三种policy策略,policy的名字都是自定义的,policy规则对每个用户的Role进行了一系列判断。
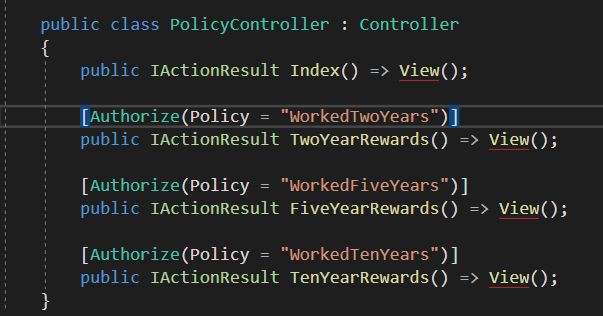
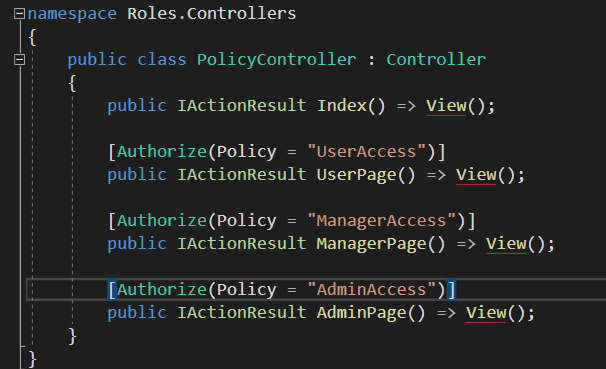
在相关页面的控制器上面,使用指定的policy规则,既可以做到对应的权限控制:
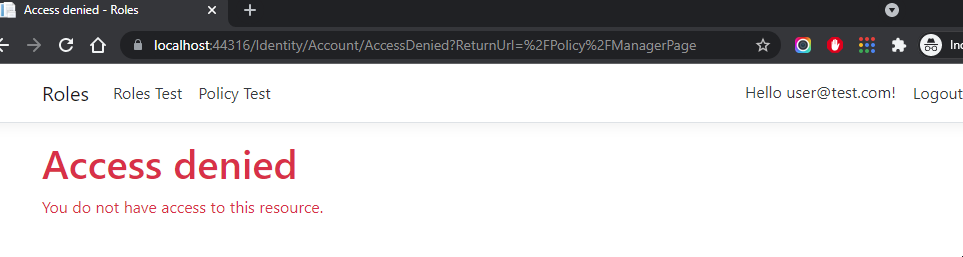
当普通用户想要进入到manager权限的页面的时候,就会出现报错:“You do not have access to this resource.”
框架提供的Identity相关字段
.net core框架内置了一些IdentityUser的字段和UserRole字段。对于比较简单的业务,使用这些内置鉴权字段已经够用了。
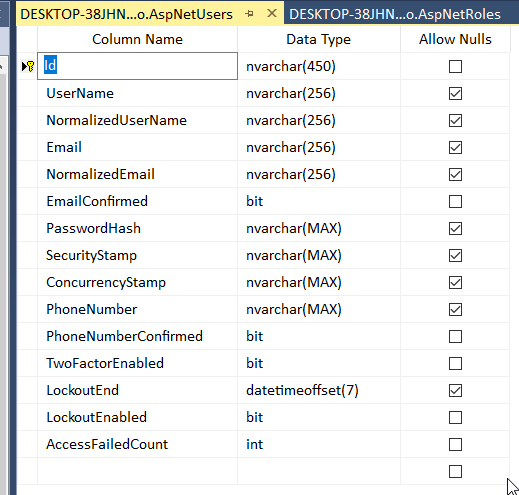
.net core框架中自带的IdentityUser这个class就包含了一些常用的属性。
namespace Microsoft.AspNetCore.Identity
{

    public class IdentityUser<TKey> where TKey : IEquatable<TKey>
    {

        public IdentityUser();
        public IdentityUser(string userName);
        public virtual DateTimeOffset? LockoutEnd { get; set; }

        [PersonalData]
        public virtual bool TwoFactorEnabled { get; set; }

        [PersonalData]
        public virtual bool PhoneNumberConfirmed { get; set; }

        [ProtectedPersonalData]
        public virtual string PhoneNumber { get; set; }

        public virtual string ConcurrencyStamp { get; set; }
        public virtual string SecurityStamp { get; set; }
        public virtual string PasswordHash { get; set; }

        [PersonalData]
        public virtual bool EmailConfirmed { get; set; }

        public virtual string NormalizedEmail { get; set; }

        [ProtectedPersonalData]
        public virtual string Email { get; set; }

        public virtual string NormalizedUserName { get; set; }

        [ProtectedPersonalData]
        public virtual string UserName { get; set; }

        [PersonalData]
        public virtual TKey Id { get; set; }

        public virtual bool LockoutEnabled { get; set; }
        public virtual int AccessFailedCount { get; set; }
        public override string ToString();
    }
}
对应的数据库表结构:(class中的15个字段)
另外,.net core框架自带的IdentityRole这个class也带了常用的属性。
namespace Microsoft.AspNetCore.Identity
{

    public class IdentityRole<TKey> where TKey : IEquatable<TKey>
    {

        public IdentityRole();

        public IdentityRole(string roleName);

        public virtual TKey Id { get; set; }

        public virtual string Name { get; set; }

        public virtual string NormalizedName { get; set; }

        public virtual string ConcurrencyStamp { get; set; }

        public override string ToString();
    }
}
对应的数据库表:(class中的4个字段)

JwtToken
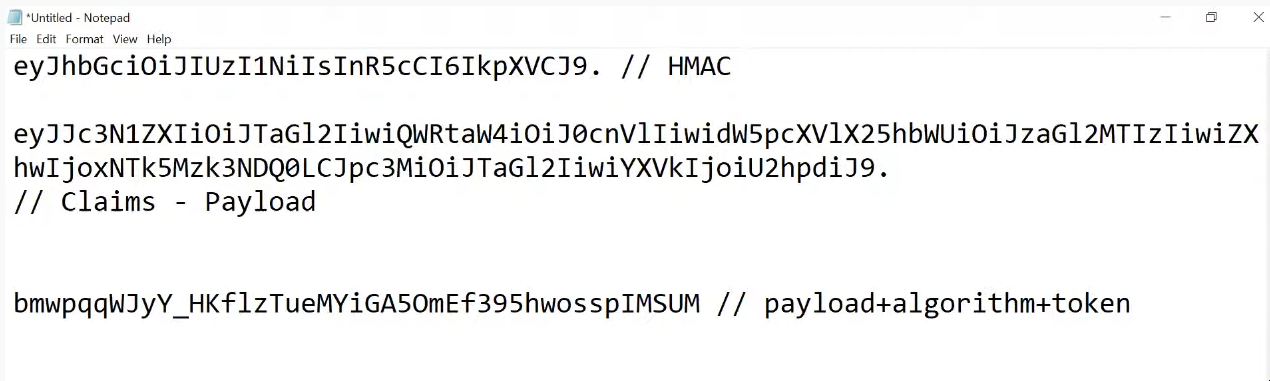
JwtToken生成的令牌中,有三个部分,分别如下图:
前面这部分是表示使用的什么加密算法;中间的部分一般是用户Claims信息,而第三部分是算法+ token。
DotNetCore权限源码
Claim类,ClaimsIdentity类,ClaimsPrincipal类。三者之间的关系:https://docs.microsoft.com/en-us/dotnet/api/system.security.claims.claimsidentity?view=net-6.0
[AllowAnonymous]
        public IActionResult Authenticate()
        {
            var grandmaClaims = new List<Claim>()
            {
                new Claim(ClaimTypes.Name, "Bob"),
                new Claim(ClaimTypes.Email, "[email protected]"),
                new Claim(ClaimTypes.DateOfBirth, "11/11/2000"),
                new Claim(ClaimTypes.Role, "Admin"),
                new Claim(ClaimTypes.Role, "AdminTwo"),
                new Claim(DynamicPolicies.SecurityLevel, "7"),
                new Claim("Grandma.Says", "Very nice boi."),
            };

            var licenseClaims = new List<Claim>()
            {
                new Claim(ClaimTypes.Name, "Bob K Foo"),
                new Claim("DrivingLicense", "A+"),
            };

            var grandmaIdentity = new ClaimsIdentity(grandmaClaims, "Grandma Identity");
            var licenseIdentity = new ClaimsIdentity(licenseClaims, "Government");

            var userPrincipal = new ClaimsPrincipal(new[] { grandmaIdentity, licenseIdentity });
            //-----------------------------------------------------------
            HttpContext.SignInAsync(userPrincipal);

            return RedirectToAction("Index");
        }
The ClaimsIdentity class is a concrete implementation of a claims-based identity; that is, an identity described by a collection of claims. A claim is a statement about an entity made by an issuer that describes a property, right, or some other quality of that entity. Such an entity is said to be the subject of the claim. A claim is represented by the Claim class. The claims contained in a ClaimsIdentity describe the entity that the corresponding identity represents, and can be used to make authorization and authentication decisions. A claims-based access model has many advantages over more traditional access models that rely exclusively on roles. For example, claims can provide much richer information about the identity they represent and can be evaluated for authorization or authentication in a far more specific manner.
Beginning with .NET Framework 4.5, Windows Identity Foundation (WIF) and claims-based identity have been fully integrated into the .NET Framework. This means that many classes that represent an identity in the .NET Framework now derive from ClaimsIdentity and describe their properties through a collection of claims. This is different from previous versions of the .NET Framework, in which, these classes implemented the IIdentity interface directly. The collection of claims that describe the identity can be accessed through the Claims property. The ClaimsIdentity class provides several methods for finding and modifying claims and fully supports language integrated queries (LINQ). In application code, ClaimsIdentity objects are typically accessed through ClaimsPrincipal objects; for example, the principal returned by Thread.CurrentPrincipal.
Note
The ClaimsPrincipal class has a Claims property as well. In the majority of cases you should access the user’s claims through the ClaimsPrincipal.Claims collection rather than through the Claims collection. You will need to access the claims of an individual ClaimsIdentity only in the cases where the principal contains more than one ClaimsIdentity and you need to evaluate or modify a specific identity.
In the claims-based model, the IIdentity.Name property and the IPrincipal.IsInRole(String) method are implemented by evaluating the claims contained by an identity. The base implementations in the claims-based model are provided by the ClaimsIdentity.Name property and the ClaimsPrincipal.IsInRole method. The NameClaimType and RoleClaimType properties enable you to specify a claim type that should be used to evaluate the claims contained by the identity when performing these operations.
参考资料
Authentication&Authorization in Asp.Net Core -Part 1
https://github.com/T0shik/rolesvsclaimsvspolicy
https://www.youtube.com/playlist?list=PLhnZol1C_88mb_BO3RgQ32lv9abBg_H89
文档信息
- 本文作者:hillcat
- 本文链接:https://cs-cn.top/2020/11/10/DotNetCoreAuhorization/
- 版权声明:自由转载-非商用-非衍生-保持署名(创意共享3.0许可证)